Feeling Frosty?
- Anna Pickering
- Nov 7, 2019
- 3 min read
The brand new Frosted Frames dies from Stampin’ Up! landed at my door on Monday, and I have been drooling over the way they cut the most beautiful, intricate frames, leaves and snowflakes.
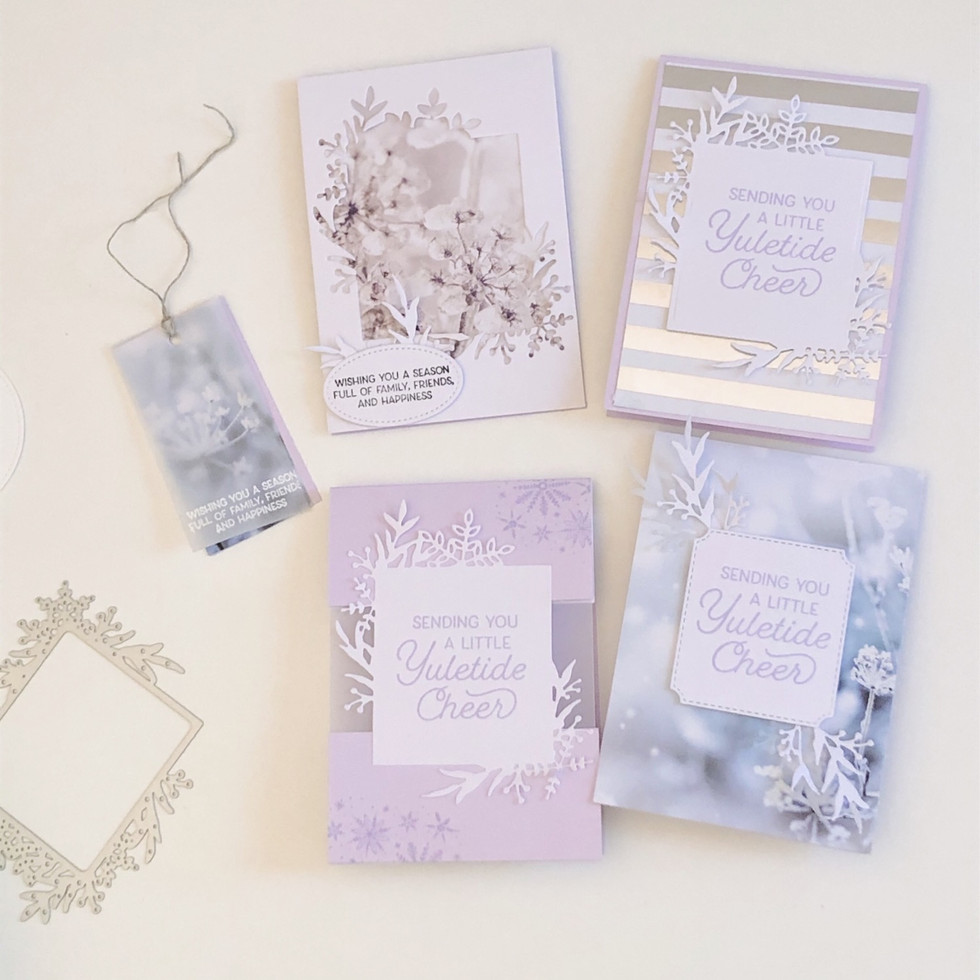
I teamed mine with the the gorgeous Feels Like Frost Papers, and Frosted Foliage stamp set. I kept it simple by choosing just two colours of cardstockstock; Purple Posy and Whisper White. This combo gives a really dreamy effect, don't you think?
I started by creating my card bases in Purple Posy, using 2 sheets of cardstock. I chose tent fold cards, which are cut length ways at 10.5cm and then scored at 14.9cm. I then cut the largest frame out of a piece of 10.5cm x 14.9cm white cardstock. I placed it centrally, so I could use the remaining piece on another card. This way you get two cards from one sheet,and one roll through on your die cutting machine. (I'm all for any crafting hacks like this that make it quicker, and easier to create).
I chose the striped silver and white design of the Feels Like Frost (FLF) papers as the background for this card. I cut it at 10cm x 14.4cm (so 5mm smaller than the base, this way you see the Purple Posy behind). To finish I simply stamped one of the sentiments in Purple Posy ink. The frame is so beautiful, it really didn’t need any embellishing, and as I am trying to be more eco conscious with my makes I left it ‘naked’. Of course you could add any gems, ribbons or even more of the snowflake or leaf die cuts if you wish. Check out Stampin' Up!'s wide range of embellishments here.
The card that is left after you cut the beautiful foliage frame out teams perfectly with the winter scene side of the FLF papers behind. I chose the smallest sentiment for this card as I didn’t want to take away from the gorgeous papers. I used my Stitched Shapes dies for this, as I wanted something smaller than the frames in this bundle. However, you could use the smaller frame (see below) and place it centrally, so you can still see the imagery behind. I added more of the leaves around the sentiment to finish.
For the card above I chose one of the many dreamy winter scenes as the background for the card, and added the smaller frame. I love how it has a stitched edging, and I could imagine this being used for tags aswell. I then decorated by adding leaves behind in white and vellum scraps. same as the previous card. (Top tip: cut out all of these types of small dies in one go, and store them in a little pot so you always have some to hand. They're great for using up all those scraps in your box).
This last card was inspired by one of my clients’ who had been inspired by the lovely Amanda over at The Craft Spa. I thought the way the frame looks as though it is floating between two strips of card was so clever. These are called Gap Cards and you can follow Amanda’s tutorial to make one of your own, they’re super easy and look fab!!
Again I used a Purple Posy tent card, with vellum behind. I added the vellum as I wanted the card to be stronger, and also so any writing behind wouldnt show through prominently. I stamped some of the gorgeous snowflakes (which are all on one stamp) in Purple Posy onto the card itself.
With the strip cut out of the gap card, and some of the Feels Like Frost scraps I made a tag. I embossed the smaller sentiment onto vellum and then simply hole punched them all at the same spot, and pulled some twine through.
If you would like to have a go making some of these yourself, you can find all the products on my online shop.
If you are local you can add to my workshop order, or even better come to our Christmas Crafternoon event and make some there.


Comments